
Part 5: Organic Laboratory Techniques
20 Purification
Once you have isolated your product, you will need to purify it. There are several ways to purify an organic compound.
Recrystallization
If your product is crystalline (or can be induced to crystallize), recrystallization is the best way to purify the compound.
Crystallization
Crystallization is the process in which a compound becomes crystalline. Often the initial product isolated from a reaction work-up is not crystalline, even though you might assume it would be. The crude product from a reaction often appears as an oil due to the presence of impurities or small amounts of solvent.
The process of crystallization is actually rather unfavorable from a thermodynamic point of view, and there are several things that you can do to enhance the crystallization process:
- Add a small amount of solvent (a few drops) to the oil and scratch the glass container to provide nuclei on which crystallization can occur. Adding solvent allows the compound to go into solution and then crystallize.
- Cool the mixture; crystallization will be more likely to occur from a cold mixture than a warm one.
- If these methods do not yield crystals, remove some of the solvent or seal the container and leave it till next session; some compounds take time to crystallize.
If all your efforts to crystallize the mixture fail, you may have to resort to purifying the compound by chromatography.
Steps for Recrystallization
Recrystallization is a technique for purifying a crystalline solid. The technique involves dissolving the solid in a minimum amount of hot solvent. The solution is then allowed to cool, and the crystals of pure material re-precipitate and can be filtered off. In the course of this operation, the impurities stay in solution (in theory) such that the material is now free of most of the impurities.
Single-solvent Recrystallization
The procedure that involves single-solvent recrystallization includes the following steps:
- Find a suitable solvent. Always use small amounts (around 100 mg or the tip of a spatula) for your trial recrystallizations. A test tube can be used as the container since it can be heated. If you know the structure of your compound, you can deduce the property of polarity and therefore make an educated guess as to which solvents to test. The ideal solvent will be one in which the compound is quite insoluble at room temperatures and soluble at higher temperature. The higher temperature you choose should be lower than the boiling point of the solvent. As a guide, consider a solute to be soluble in a solvent if it dissolves 30 milligrams per milliliter of solvent, or more.[1]
So, for example, a non-polar organic compound would not be soluble in water at any temperature, and thus water would not be a suitable solvent. On the other hand, a non-polar solvent might dissolve the compound even at low temperatures, and thus would not be a good recrystallization solvent either. The best way to establish the optimal solvent is through trial and error, but you can rule out some solvents with knowledge of how the structure of the chemical determines its properties.
- Perform the test on a small scale. Add a small portion of your solvent in a dropwise manner to the test tube and record your observations. If the solid dissolves, try another solvent. When you find a solvent that does not dissolve the solid at room temperature, heat the solvent with a water bath, a steam bath, or a sand bath. Do not use a flame unless the solvent is water. Observe and see if the solid dissolves. If it does, cool the solution under running water while shaking the test tube and observe to see if crystals form. If the solid is not soluble even at high temperatures, try another solvent.
- Rapidly cool the system. Add the minimum amount of hot solvent to the solid mixture until all dissolves. Cool the solution quickly and look for signs of crystallization. Smaller crystals are formed from quickly-cooled solutions, which are easier to handle and filter. If you need larger crystals, allow the solution to cool slowly.
- Seeding and Scratching. If no crystals have formed after ~5 minutes of cooling, try scratching the side of the test tube with a spatula or glass stir rod. This will provide a rough surface which promotes crystallization. Alternatively, you could introduce a small “seed” crystal of the material on which the chemical can attach to an already-formed crystal and continue the process. Generally, the initial stages of crystallization are thermodynamically unfavorable, but once the process has begun it will proceed without any further help from you.
- Reduce the amount of solvent. If no crystals have formed even after “seeding and scratching”, try boiling off some of the solvent in the hood and repeating the cooling procedure.
- Start over with a new solvent. If still no crystals form, boil off all the solvent in the hood and try another solvent.
The procedure that involves multi-solvent recrystallization is similar.
Binary-solvent Recrystallization
When using binary–solvent recrystallization, the procedures include the following steps:
- Find two suitable solvents. First solvent A should have a high solubility for the target compound at high temperature. Second solvent B should have a low solubility for the target compound. Both solvents should be miscible.
- Perform the solubility test on a small scale. Add a small portion of your solvent in a dropwise manner to the test tube and record your observations. If the solid dissolves, try another solvent. When you find a solvent that does not dissolve the solid at room temperature, heat the solvent with a water bath, a steam bath, or a sand bath. Do not use a flame unless the solvent is water. Observe and see if the solid dissolves. If it does, cool the solution under running water while shaking the test tube and observe to see if crystals form. If the solid is not soluble even at high temperatures, try another solvent. Choose the binary-solvent system based on small-scale tests.
- Recrystallize the solid using binary solvents upon cooling. Add the minimum amount of hot solvent A to the solid mixture until all dissolves. Slowly add solvent B until crystals form. Cool the solution quickly for more precipitation. Smaller crystals are formed from quickly-cooled solutions, which are easier to handle and filter. If you need larger crystals, allow the solution to cool slowly.
- Seeding and Scratching. If no crystals have formed after ~5 minutes of cooling, try scratching the side of the test tube with a spatula or glass stir rod. This will provide a rough surface which promotes crystallization. Alternatively, you could introduce a small “seed” crystal of the material on which the chemical can attach to an already-formed crystal and continue the process. Generally, the initial stages of crystallization are thermodynamically unfavorable, but once the process has begun it will proceed without any further help from you.
- Reduce the amount of solvent. If no crystals have formed even after “seeding and scratching”, try boiling off some of the solvent in the hood and repeating the cooling procedure.
- Start over with a new solvent. If still no crystals form, boil off all the solvent in the hood and try another solvent.
When you have found a suitable solvent and recrystallized a small batch of solid, scale up the procedure using an Erlenmeyer flask as the container and purify the whole sample. Remember, you can always get your material back by boiling off the solvent, but then the material will not be purified. When your material has recrystallized, filter off the solid with vacuum filtration and retain the liquid. It is possible to repeat the procedure and obtain second crop of crystals, but they will usually be less pure than the first crop.
Distillation
Distillation is a method of separating volatile liquid mixtures based on their boiling point differences or separating a volatile liquid from a solid. The liquid may be the product of a reaction or perhaps the solvent for a reaction. If your product is a liquid that boils below ~20°C, you can distill the liquid at atmospheric pressure. For liquids over 150-200°C, you will need to distill the liquid under reduced pressure.
There are two different kinds of distillation: simple distillation and fractional distillation.
Simple Distillation
Simple distillation is typically used when the boiling points of the components in a liquid mixture are significantly different (greater than 100°C difference) and when the goal is to separate the components efficiently without needing high purity. In a simple distillation process, the lower boiler liquid will vaporize in the original flask, pass the side arm, condense under cooling water in the condenser and be collected as “distillate”. A thermometer was used to monitor the evaporation process.
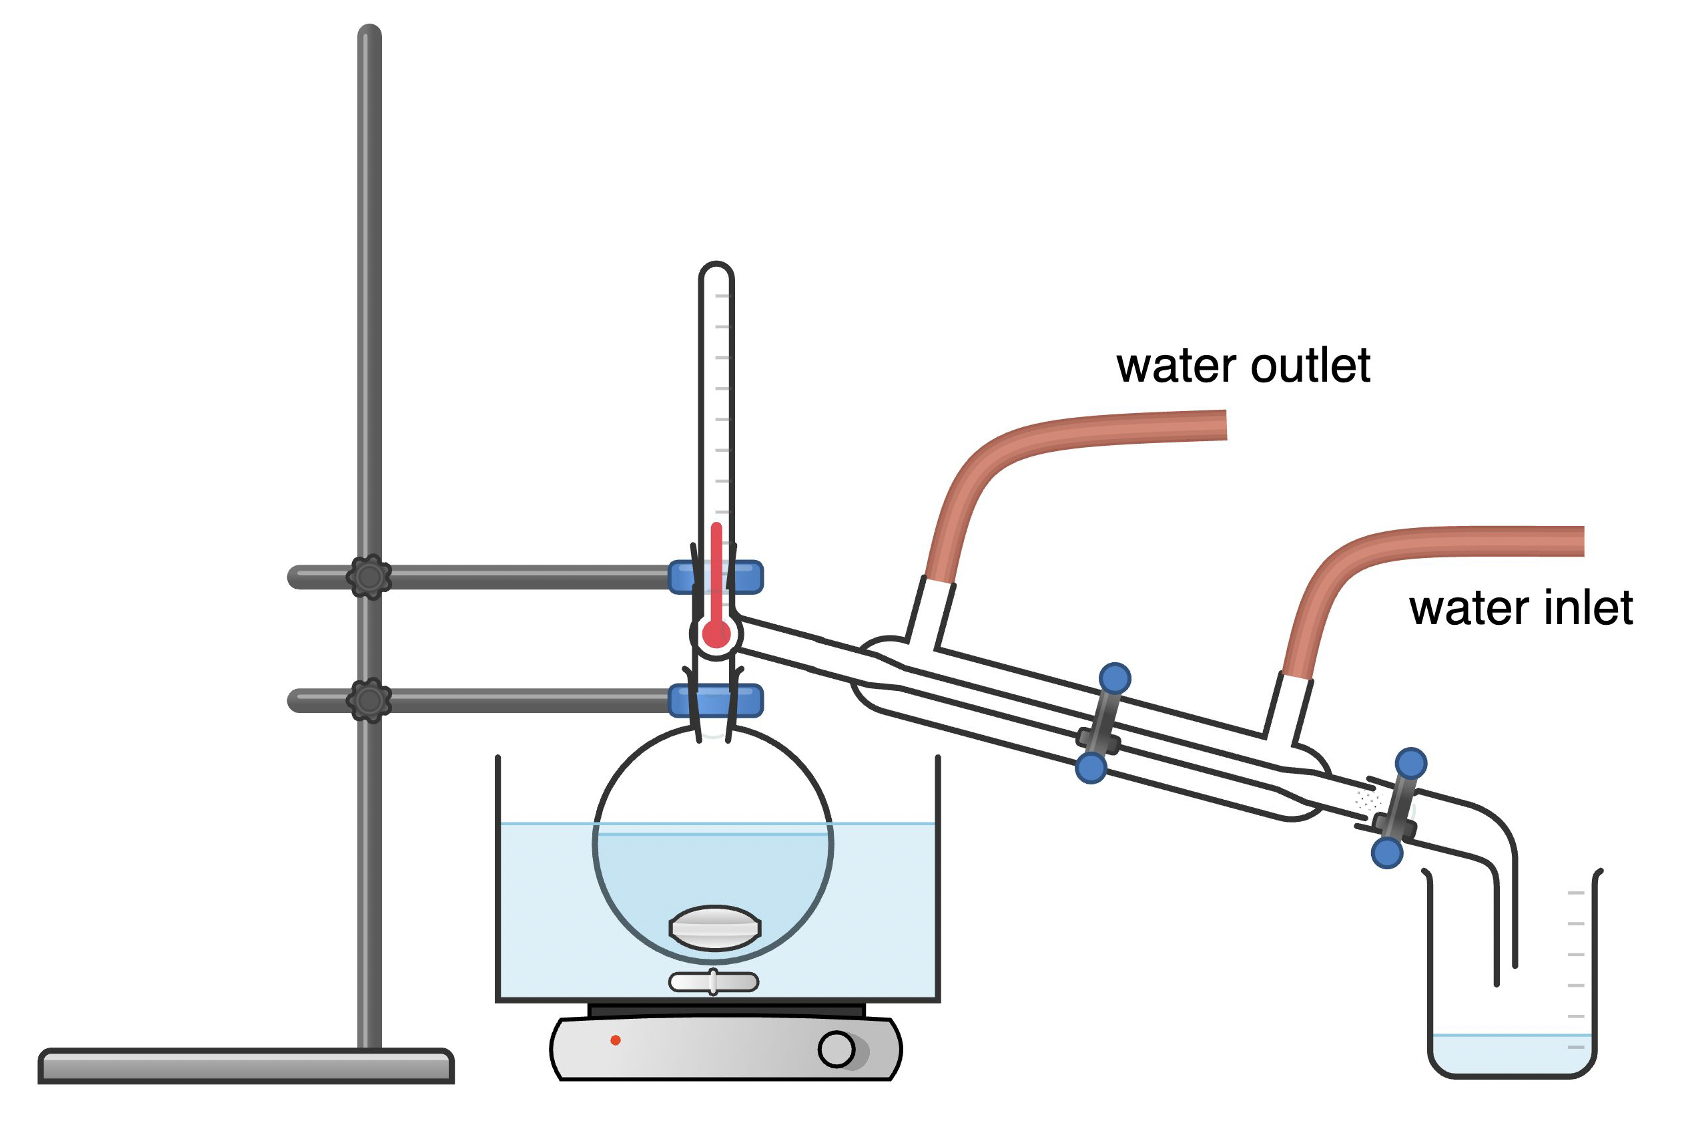
A simple distillation setup typically consists of a round bottom flask containing the liquid mixture to be distilled, a distillation head with a thermometer for temperature monitoring, a condenser to cool and condense the vapor, and a receiving flask to collect the distillate. The boiling flask is heated, and the component with the lower boiling point vaporizes first. The vapor travels through the distillation head and into the condenser, where it is cooled and condenses back into liquid form. The condensed liquid drips into the receiving flask, resulting in the separation of components based on their boiling points. There should be a magnetic stir bar in the water bath and another stir bar in the boiling flask to ensure even heating. All glassware should be fixated with clamps to the ring stand.
Simple distillation is a straightforward process that requires less time and energy. It is usually used when a rough separation is sufficient.
Fractional Distillation
Fractional distillation, on the other hand, is used when the boiling points of the components are closer together (less than 100 °C apart) and when a higher degree of separation and purity is required.
Fractional distillation utilizes fractional column (or “fractionating column”) where separation is more thorough and complete. A fractionating column allows for many successive mini distillations within one column. Each mini-distillation (called a “theoretical plate”) represents a complete vaporization and condensation process.
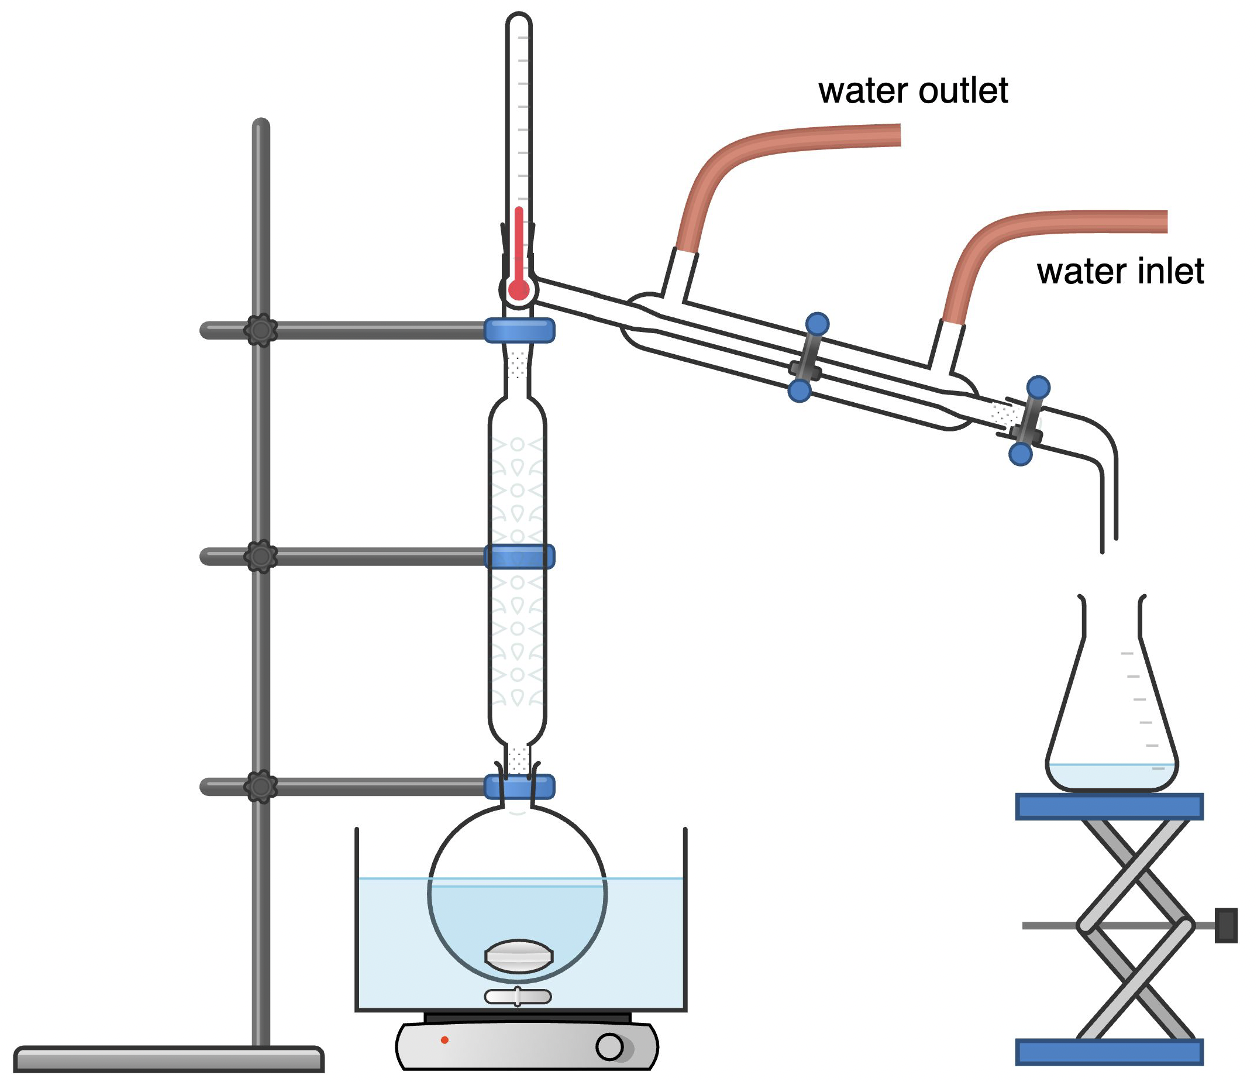
A fractional distillation setup is similar to a simple distillation setup but includes a fractionating column between the boiling flask and the condenser. The fractionating column contains a series of glass beads or plates that provide a large surface area for vapor-liquid contact. As the vapor rises through the column, it condenses on the surfaces and then re-evaporates, undergoing multiple vaporization-condensation cycles. This process helps to separate components with closer boiling points by allowing for more efficient separation based on differences in vapor pressures.
Fractional distillation is used for liquid mixtures of small boiling point differences and normally takes longer and consumes more energy. From a green chemistry perspective, simple distillation should be considered first for energy-saving purposes when it comes to separating liquid mixtures with large boiling point differences.
Atmospheric Large Scale
Liquids that boil up to 200°C can be distilled at atmospheric pressure. If you are unsure of the boiling point of your material, you can do a trial boiling point determination by heating a small sample of the liquid in a test tube in a sand bath. When the liquid begins to boil, take the temperature of the vapor just above the liquid surface.
- Set up the apparatus as shown above with the distillation flask placed in a water or sand bath, depending on the temperature needed for distillation. The distillation flask should be no more than half full. Make sure all the joints are tight. If you have a loose connection, you will lose your material to the atmosphere, and you might expose everyone to hazardous vapor.
- Make sure that you have a couple of boiling chips in the liquid before you begin to heat the flask. If you begin without boiling chips, the liquid may get superheated and “bump”, causing the liquid to spill over into the receiving flask without being distilled. If you forget to add the boiling chips, you will need to cool the liquid before you add the chips, otherwise the liquid will boil up vigorously and potentially boil onto you (leading to severe burns and exposure to irritating chemicals).
- Place the thermometer head at the level of the adapter leading into the condenser, so that the temperature of the vapor that is being condensed is the one that is being recorded.
- The condenser should have the water entering and leaving as shown. If the boiling point of the liquid to be distilled is over 100°C, an air condenser (i.e., a condenser with no water flowing through it) should be used.
- Distill a small amount of liquid into another receiver. Then, when the boiling point of the liquid stabilizes, remove that receiver, and replace with a new clean flask. Distill the liquid until the boiling point starts to rise, or until there is ~1 mL of liquid in the distillation flask. Never distill to dryness.
- Disassemble the apparatus while the glassware is still warm, using caution. If you leave the glassware until it is cool, the joins will likely contract, and you will not be able to get the pieces apart.
- Put the stopper on the receiving flask containing your newly-purified material.
Reduced Pressure Large Scale
If you have a liquid whose boiling point is over 200°C, it may be difficult to distill for several reasons. It may decompose when heated in air at high temperatures. Alternatively, the apparatus in the lab may not be capable of reaching the temperatures needed.
In this case, you will need to perform the distillation at a reduced pressure which will lower the boiling point of the liquid. To carry out a reduced pressure distillation, the following changes must be made to the distillation setup described above:
- Set up the apparatus, but instead of boiling chips, place a stir bar in the distillation flask.
- Turn on the stir plate and then connect the aspirator hose to the vacuum adapter outlet on the receiving flask.
- Turn the aspirator on fully, and then start to heat the distillation flask.
Continue as you would for an atmospheric macroscale distillation, discarding the first fraction that is distilled; collect the distillate (liquid that has been distilled) that comes over at constant temperature.
Small Scale
For distillations of amounts less than 5 mL, a microscale still should be set up instead of a large-scale distillation.
Column Chromatography
If you isolate an oil from your workup that will not crystallize, it may need to be purified by column chromatography. Chromatography is a powerful technique used to separate non-volatile solids or liquids mixture based on their different affinities with the mobile phase and the stationary phase. This separation is achieved by exploiting differences in the distribution of the components between the two phases, typically due to variations in adsorption and elution properties, for example, polarity, size, charge, or other chemical properties.
A column chromatography usually follows five steps, as illustrated in Figure 17:
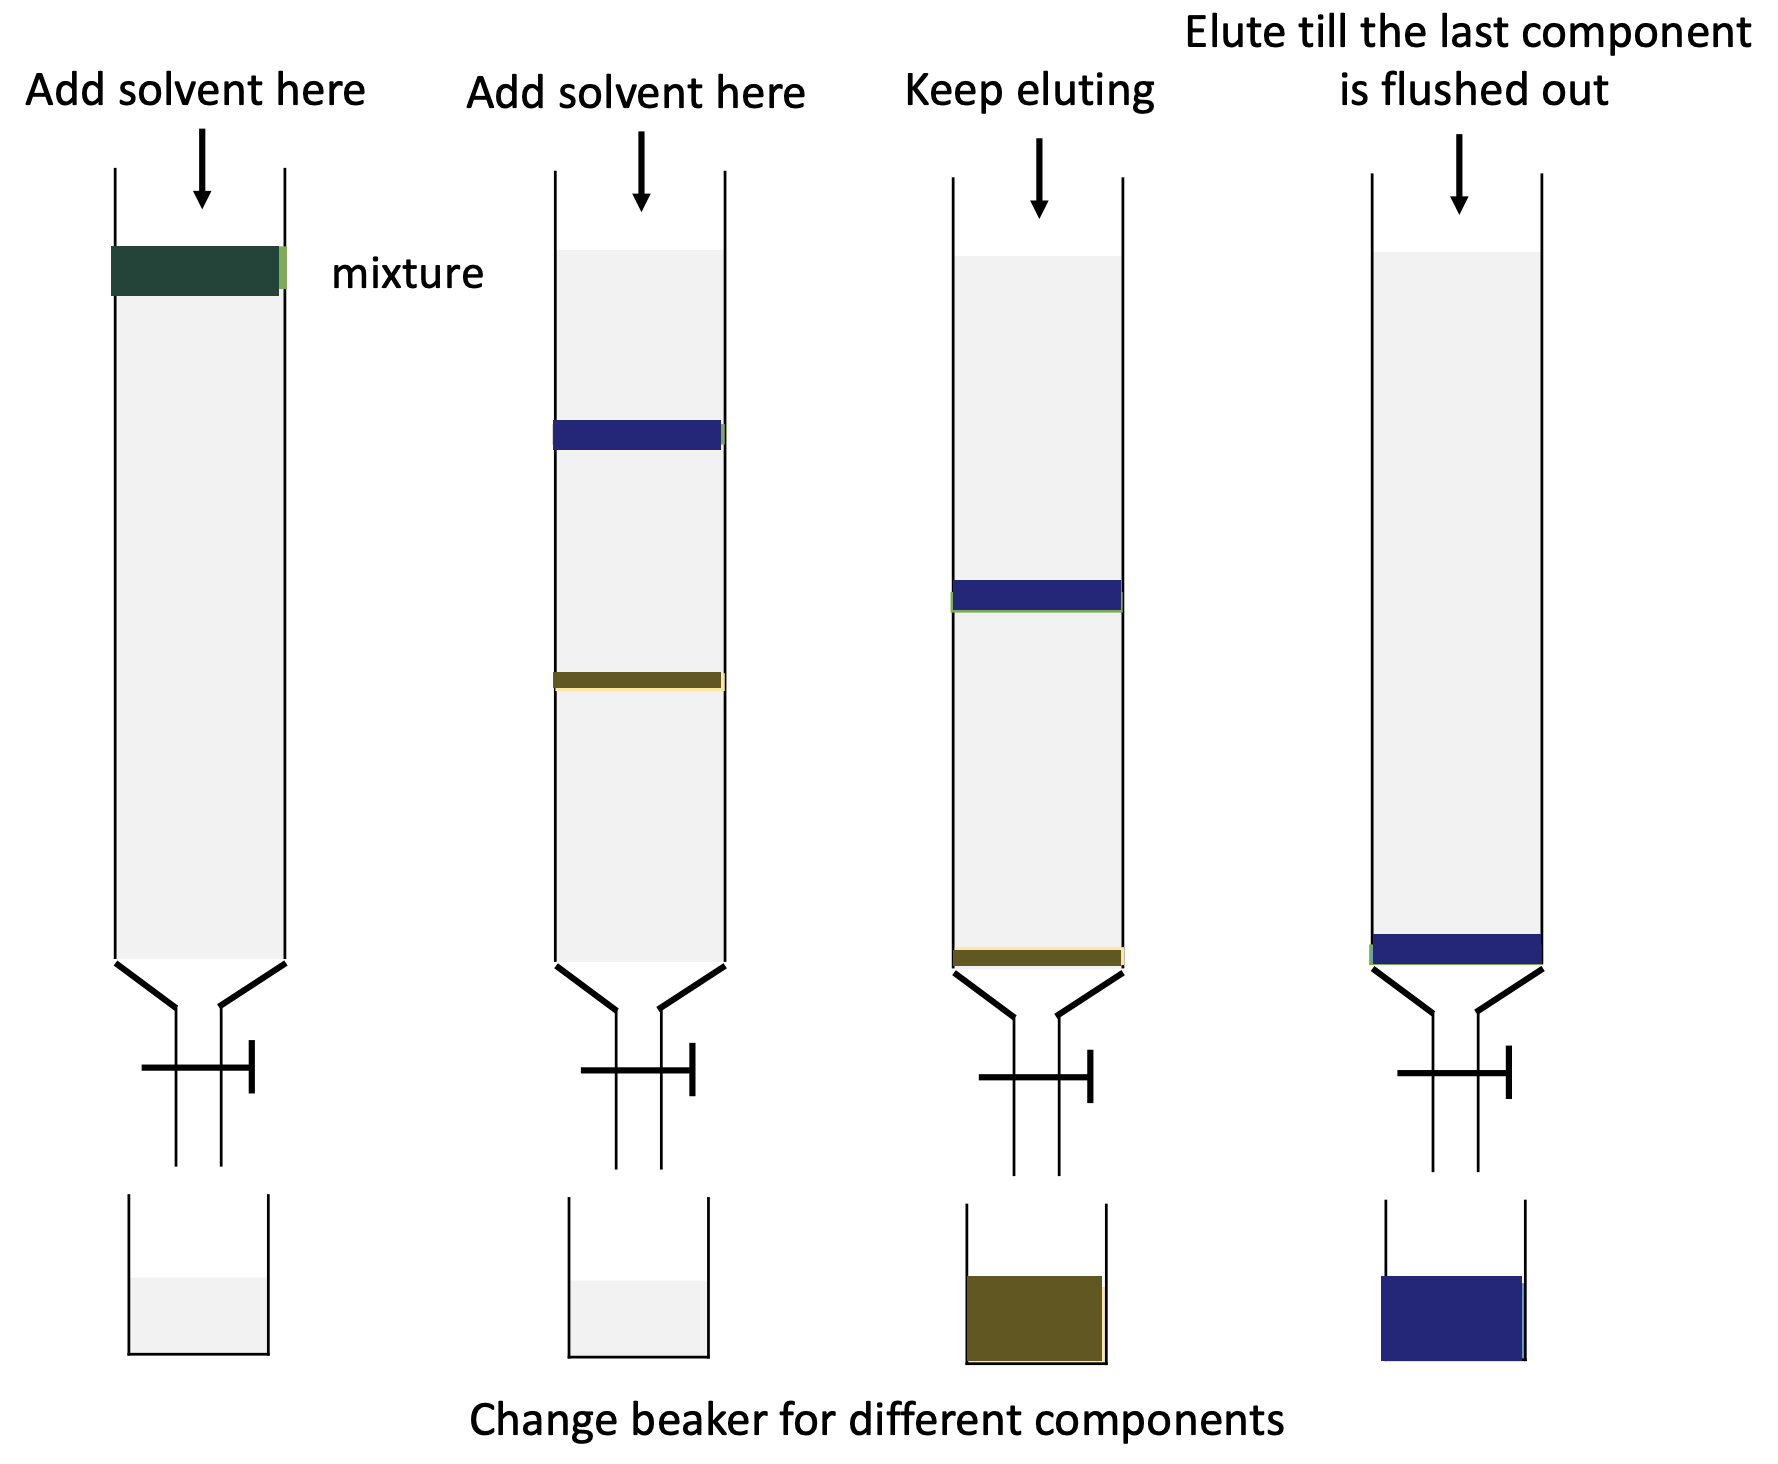
- Column setup: A glass column is packed with the stationary phase, which is typically silica gel or alumina. The stationary phase is prepared by wetting it with a small amount of mobile phase (elution solvent) before the separation begins.
- Loading the sample: The mixture to be separated is dissolved in a small amount of the mobile phase and loaded onto the top of the column. The sample is usually loaded using a pipette, and care is taken to ensure that the sample is loaded in a small, concentrated band and not interrupting the packed column.
- Elution: The mobile phase is then passed through the column using a gravity flow or a pump. As the mobile phase flows through the column, the different components of the mixture interact with the stationary phase to varying degrees. Components that interact more strongly with the stationary phase move more slowly through the column, while those that interact less strongly move more quickly. Note that you may not be able to witness the color change or separation as most compounds are colorless. Real-life monitoring is necessary.
- Collection of fractions: As the components elute from the column, they are collected in fractions. Each fraction represents a different component of the mixture. The fractions can be collected manually by collecting drops or using a fraction collector.
- Analysis: The collected fractions can be analyzed using various techniques such as thin-layer chromatography (TLC), gas chromatography (GC), or mass spectrometry (MS) to identify the separated components.
Note: The column should not run “dry”—keep adding solvents from the top until the separation is complete.
- Lehman, J. W. Operational Organic Chemistry: A Problem-Solving Approach to the Laboratory Course, 3rd ed. Prentice-Hall: Upper Saddle River, NJ, 1999. ↵
