
Digital Literacy and Collaborative Learning Lesson Plans
In the Spring of 2017, Rollins College received funding from the Associated Colleges of the South for a two-day Digital Literacy and Collaborative Learning (DLCL) workshop. The workshop was designed by Julian C. Chambliss, formerly Department of History at Rollins College, currently Michigan State University Department of English, and Scot French, Department of History, University of Central Florida, to develop a cross-institutional framework for promoting broadly collaborative, community-based undergraduate and graduate student research employing the tools and methods linked to digital humanities. The workshop would serve as a foundation to expand faculty dialogues and initiatives at each institution connected to community engagement and digital humanities. Rollins College has received national recognition for its ongoing commitment to community engagement, and the University of Central Florida (UCF) has a public history program and a wider institutional mandate to engage with the Central Florida community. The workshop allowed faculty cohorts from Rollins College and the University of Central Florida to explore digital humanities methods and tools and then create lesson plans that would be used in the classroom. The format of a two-day workshop to immerse faculty in digital humanities methods was conceived by Drs. Chambliss and French based on their experience from the unconference model used by The Humanities and Technology (THAT) Camp. This approach sought to create a smaller cohort experience that emphasized digital intervention in established teaching practice as a means to encourage faculty participation. The lesson plans on display highlight the participant’s ability to incorporate digital methods into their classroom plans.
 Caroline Cheong
Department of History University of Central Florida
Caroline Cheong’s research focuses on the relationship between urban heritage conservation and economic development, values-based conservation management, conservation economics and poverty reduction. She has presented her work at numerous conferences, including the Association of Collegiate Schools of Planning Conference, UN-Habitat’s World Urban Forum, and the ICOMOS General Assembly.
Timeline Project
The project is based on a Latin American History course Dr. Cheong teaches. This is intended to be a final project.
For your final project, create a timeline using the Timeline JS tool at https://timeline.knightlab.com/ (Links to an external site.)
You’ll focus on a specific theme from the list below. If you would like to focus on a theme that is not listed below, I must approve it beforehand to ensure you have access to enough sources and material to successfully complete the assignment.
You can pull from material across the entire semester, though you should emphasize the latter half the semester.
**Your timeline MUST tell a story – make sure you emphasize the specific arc of your story in each entry, so it threads together.
Requirements
- Must involve at least 3 countries
- Minimum of 7 entries
- Each entry must have at least 1 photo (you can have multiple entries for 1 event/date, but that still counts as 1 entry).
- Introduce your timeline, explaining your timeline and choices, in a separate word document that you will upload on Webcourses of at least 500 words.
- Must include citations via footnotes and an attached bibliography (which you should include in the same document as the introduction).
- Include a link to your timeline in your Word document.
Themes
Caudillos – pre and post-revolutionary Cold War and US involvement
Cuban Revolution and the creation of modern Latin America Drugs and nation-building
Neoliberalism

Dan S. Myers, Department of Math and Computer Science Rollins College
Dan Myers received his Ph.D. in Computer Sciences from the University of Wisconsin-Madison, with research interests in computer performance modeling and queueing theory. Prior to attending UW-Madison, he worked as a Senior Member of Technical Staff at Sandia National Laboratories in New Mexico, applying computer vision and image processing to national security problems.
Virtual Tours in Twine Overview
Students will create a ground-level virtual presentation of a building, neighborhood, or other place using Twine, a web-based framework for creating digital narratives. Twine programs can incorporate text, hyperlinks, images, and interactive elements to give their users an immersive, content-rich experience. To complete the project, students must research the history of their location, including its notable sites and elements, collect historical and contemporary images, and then develop the text-based presentation using the Twine engine.
Learning Objectives
- Conduct archival or other research into the history of a building, place, or other location, including, where appropriate, primary sources.
- Embody the results of that research in an interactive presentation written in the Twine engine.
Digital Tool
The Twine engine allows users to create interactive stories and other narratives through a web-based programming interface.
Twine narratives are structured as a directed graph, where each node in the graph is a “chapter” in the story, representing a discrete text page. Each page contains links to other pages, allowing the user to make choices or move through the story, often in nonlinear ways. Stories can incorporate images and links to external sites. Twine programs are web pages, so any element that can be part of a normal web page can generally appear in a Twine chapter.
The engine also includes support for a number of programming features, including the ability to track state variables throughout the story and incorporate interactive elements. Twine stories can be downloaded and shared through a text-based file format.
Project Stages
- Students identify a location of interest based on the theme or topic of the class.
- Students conduct research to identify 3-6 locations of interest in their place, along with their geography. The scope of the research can be based on the goals of the class (for example, archival research focusing on primary sources) as well as student proximity to the site.
- Students construct the Twine story giving a ground-level walkthrough of their location. Each page in the story corresponds to a location, with features like streets and stairs possible appearing as intermediate pages between featured locations. Links give the user the ability to move between locations. Nonlinearity and creative organization is encouraged.
Activity
Prior to beginning the assignment, students are introduced to the Twine system through a few lectures and guided examples. Twine is not difficult and requires no programming background (though more advanced features operate like programming elements). A full explanation of all the basic features can be given in 3-4 class sessions, with one of those reserved for a guided lab where students create their own short story. The minimum Twine features required to
create a presentation can be explained in less than half a class period and summarized on a one-page handout.
The style of the project can be adapted based on the needs of the class and the instructor’s preference. It could be straightforward and factual or incorporate fiction and narrative elements. It could be written in a detached style, like a guide book, or more personalized, like a journal of a visit. The range of required features can also vary. A moderately complex set of project features could include:
- Descriptive text and links between pages
- Links to external sites
- Images
- Text and images that dynamically appear and disappear as the user clicks on links
- A set of variables that track the locations the user has visited
- A conditional statement that notifies the user and ends the tour when every location has been visited
Amanda Snyder
Department of History
University of Central Florida
Amanda Snyder’s research focuses on sixteenth and seventeenth-century international maritime law and Caribbean settlement, specifically surrounding the experience of Atlantic piracy. Her work explores the changing definitions of criminality and the influence and development of rover, “extranational” communities in creating the new Atlantic World. She has worked in several international archives and been a part of several international symposiums on Atlantic History. She recently published “Reassessing Jamayca Espanola” in the The Torrid Zone: Caribbean Colonization and Cultural Interaction in the Long Seventeenth Century.
History of the Caribbean timeline Overview
This assignment is a primary source analysis. Students of History must understand what a primary source is, how to find those sources by identifying databases and archives, and must learn how to effectively analyze those sources within the larger historical framework. Students practice both formal and casual presentations of these analyses through longer papers, discussions, and condensed analysis. The final part of this assignment requires students to package their analysis for public dissemination as a larger timeline.
Learning Objectives
To learn about and practice archival research.
To become more proficient and comfortable with digital archive research.
To practice analysis of primary source material as part of professionalization within History field.
To practice both formal and casual presentation of historical analysis. To become more comfortable and proficient in online tools.
Digital Tool
KnightLab Timeline JS
Project Stages
Students conduct research to find a primary source relating to the course time period and geography. This is the second primary source assignment that students conduct over the course of the semester.
Students are expected to analyze and contextualize that source within the larger course themes, using the assigned readings.
One part of the assignment requires the students to submit a two-page formal analysis. Accompanying this paper, students submit a condensed analysis to the timeline tool (spreadsheet).
Activity
My goal in this assignment, aside from the student learning outcomes, was to test the limits of the tool. I teach at a particularly large state university where even upper-level courses have 48 students in them. I have found that most digital tools can only support up to 12, perhaps 15, collaborators. My goal was also to learn more about the tool myself—where information needs to be placed, how many characters can be each cell, and how to export the material for public dissemination. In an increasingly digital and competitive world, I hope that these sorts of exercises will also provide the students with an end product that they can also refer back to and use in portfolios to showcase their own skills and experience with digital tools and digital publishing, aside from being an interactive teaching tool for me to speak to different student learning styles.
Students are provided with an array of online databases to begin doing their research. They are also provided with instructions about how to evaluate websites for academic integrity.
Students are then tasked to choose their own source that relates to the course themes, period, and geography.
For this assignment, they then produce a condensed (200-word) analysis of the source. That analysis, along with an image of the source, is entered into the timeline spreadsheet.
Once all students submit, I, the professor, am responsible for preparing it (figuring out the glitches and order) for web publication. [This final part has proven unsuccessful.]
Instructions to students (First, general primary source instructions followed by second primary source and timeline instructions):
There are two parts to your assignment: a primary source analysis and the Discussion Facilitation.
At this point in your History careers, you should know what a primary source is. Please see the link about how to read (Links to an external site.)Links to an external site. and identify primary sources if you have questions about how to identify and verify a primary source. Examples can also be found here. You will not be doing a powerpoint
The 2-page analysis will describe in more detail the context, but MOST SIGNIFICANTLY the significance of this source to the course themes and readings from the semester. Your response papers have condensed 200+ page books into two pages, and this assignment will ask you to really dig into one document.
You see the short writeup and questions that I have posed to you the last two weeks, and that the first group will be posing to you today to kick off this week’s discussion. This is what your group will be crafting. You will ask questions about the sources/material to your classmates to facilitate discussion.
Remember that the discussion is due to me ideally by the Friday prior. It must be posted by Monday of the week of it is due for your classmates to be able to answer and comment. For example, if you are crafting discussion for next week, due 9 June, I need your writeup no later than [date].
Within that writeup, you will also individually post your primary source. You will not post the entire 2-page writeup that you submit to me, but you will post the source itself with a few questions for your classmates to analyze it (as we did with de Bry, for example).
Primary Source Instructions
At this point in your History careers, you should know what a primary source is. Please see the link about how to read (this link has broken this in the last six months) and identify primary sources if you have questions about how to identify and verify a primary source.
Consider the following: What was going on at the time the source was written? Who was the author? Why was the author significant—or at least what was their situation that contributed to their writing on the source, their particular insight? Where was this source written and/or published? Who was the intended audience?
The 2-page analysis will describe in more detail the context, but MOST SIGNIFICANTLY the significance of this source to the course themes and readings from the semester. Your response papers have condensed 200+ page books into two pages, and this assignment will ask you to really dig into one document.
For your first primary sources, you did an accompanying discussion facilitation. For this second assignment, you will be adding to the KnightLab timeline (linked in the assignment dropbox and Resources pages). You will enter your source’s information in the spreadsheet provided, and include a paragraph summary description of the source’s context and significance. This paragraph will be approximately 150-200 words, like the length of your weekly discussion posts. Remember, concision and editing is just as important in the writing process as getting those initial words on paper!
Amy Parziale
Department of English
Rollins College
Dr. Parz’s teaching and research interests include 20th/21st century multi-ethnic American literature; film, visual, and cultural studies; women’s and gender studies; and the representation of trauma, disaster, and diaspora.
Reenvision Writing
Overview
As part of a writing course designed for non-traditional students at Rollins College’s Hamilton Holt School, students were tasked with (re)envisioning their traditional term papers into another form of media.
Learning Objectives
- Demonstrates awareness of context, audience, purpose, and to the assigned tasks(s) (e.g., begins to show awareness of audience’s perceptions and assumptions).
- Uses appropriate and relevant content to develop and explore ideas through most of the work.
- Makes critically aware decisions about how best to achieve their purposes in communication at the university and beyond.
Digital Tool
- Adobe Spark
- Tools of their choosing
Project Stages
- Online educational profiles, early in the semester.
- Apply an understanding of rhetorical situation and rhetorical strategies, mid-semester.
- After turning in a traditional term paper on research topic, reimagine that same argument into a new form/medium for their target audience by end of semester.
Activity
The course opens with Adobe Spark because it is a intuitive and straight forward tool that creates professional quality products. After several light touches into multimodal communication at the start of the semester, students learn more specifically about multimodal communication while they contemplate how to best reach their target audience for their final portfolio. This final assignment consists of a final project (in the medium the student believes will best reach their specific audience), a presentation, and an analysis paper (in which the student must detail their process and choices as well as critique their final product.
Students have turned their research into brochures, websites, Facebook groups, blogs, vlogs, conceptual art, public service announcements, even performance art. Depending upon the course topic, I have also required students to reach out to their target audience and ask for feedback on their final product to include in their analysis papers. This, along with the presentations (which can be public or in-house), creates added responsibility and risk for the students, and for many students, this simulates their work life more closely than a traditional term paper assignment.
While their final products and presentations are vital to this project, I find the analysis papers to be the component that assists me the most in the evaluation of the portfolio. Adding the students’ thought processes, struggles, and successes to this assignment, along with feedback received from their target audience, add to the nuance and understanding for its assessment.
I have used versions of this lesson plan in writing classes with both traditional and nontraditional undergraduates at both small liberal arts colleges and large, land-grant universities, and the results illustrate a level of rhetorical awareness that often was not discernible in their researched term papers. Currently, I use the textbook The Academic Writer, by Lisa Ede in its 4th edition (Bedford/St Martin’s).
Schedule Excerpts:
Week 1: Read Syllabus and selected Educational Biographies. Write your Educational Biography and bring a copy to class to discuss. Read Chapters 1-2 (Reading and Writing Rhetorically).
Week 2: Take the reading process and writing process “quizzes.” Revise and combine your educational biography and quiz answers to create a profile of yourself as a reader and writer using Adobe Spark. Post your profile to our discussion forum by{insert date before class meeting}.
(In-Class Week 2: Reintroduce yourself using Adobe Spark profile as a jumping off point.)
Week 12: Bring all of your research and work on your term paper in class. Prep for the Final Project: Read chapter 11 “Multimodal Composition” and complete exploration on listing possible types of multimodal texts & your comfort level with them. (In-class: Review final project portfolio assignment and brainstorm possible media, tools, and strategies.)
Week 13: Term Paper Draft due. Due for Final Project: Review chapter 11 (and others as needed). Complete exploration analyzing a multimodal text from the reader’s perspective, and plan your final project using the guidelines on 330-1. (In-class: Present final project plans and receive feedback.)
Week 14: Term Paper Draft #2 due. Due for Final Project: Come with your ideas for your final project. Be ready to conference 1:1 during class with faculty and instructional technologist.
Week 15: Term Paper due. Due for Final Project: Bring your final portfolio drafts. Come ready to troubleshoot and discuss all components of final. Instructional Technologist in class for assistance.
Week 16: Final Project Portfolio due. Present your final project. Turn in final project and analysis essay.
Tiffany Earley-Spadoni Department of History University of Central Florida
Tiffany Earley-Spadoni’s research explores the construction of fortress landscapes in the ancient Near East, and her digitally-engaged scholarship employs remote sensing, GIS and digital storytelling. She directs the Vayots Dzor Fortress Landscapes Project, a field archaeological project in southern Armenia.
Communicating Place with Digital Storytelling (WeVideo)
Overview
Students will use the web-based digital storytelling tool WeVideo to produce digital shorts that communicate a strong sense of place.
Learning Objectives
- Students will appreciate the variety of ways that a sense of place can be communicated using a multimedia presentation–by images, videos, sounds, music and describing unique experiences.
- Students will create a digital short using WeVideo that communicates a strong sense of place.
- Students will develop digital literacy by beginning to appreciate the implications of copyright law in creating public domain content and understand privacy settings when using a video hosting service.
Digital Tools
- External microphone
- Video hosting: Vimeo or Youtube
Project Stages
- Students will brainstorm place by making a creative cluster.
- Students will use the insights derived from their creative cluster to free write several paragraphs about a place that is “home” to them. They will be encouraged to approach the topic both analytically and emotionally.
- I will introduce the concept of “six word stories” and show two examples.
- Students will write a six-word story about their “place” and share them with class.
- Students will now write ten sentences that start with, “I Come From a Place” and complete them with details from their freewriting exercises.
- Students will work in pairs to pick their “best six.”
- I will show three example short films and students will analyze how the filmmakers communicate a sense of place.
- Students will go on a “digital scavenger hunt” and find six images or video clips in Creative Commons that express the ideas communicated in their six “I Come from A Place” sentences.
- I will demonstrate to class how to import images into WeVideo and how to create voiceovers.
- Students will bring the “finds” from their scavenger hunt into WeVideo and then make voiceovers with their external mics for their images using their six “I Come from a Place” sentences.
Activity
For a two-hour class period. Free-Association
Begin by having each student make a Creative Cluster with the word place:
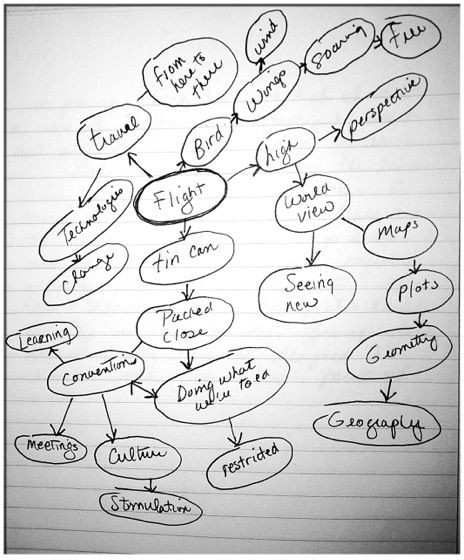
(h/t: Writing Through Life)
Write a few paragraphs that describe the/a place that you come from—the place that is home. List as many physical, emotional, and social details as possible.
Students will write ten sentences that start with, “I Come From a Place” and complete them using their brainstorming from the previous activities.
Students will work in pairs to pick their “best six.” I will explain that eliminating some content is an important part of editing—a principle that can be applied to all creative endeavors.
Show Some Examples of Digital Stories—Analytical Exercise
Stardust
https://iamucf.cah.ucf.edu/2017/04/26/tori-i-am-ucf/ Discuss what worked and what didn’t work.
Some specific questions:
- Where is this story set?
- Does the filmmaker do a good job of communicating place?
My Favorite Murder Date
https://iamucf.cah.ucf.edu/2017/04/27/i-am-ucf-my-favorite-murder-date/ Discuss what worked and what didn’t work.
- Where is this story set?
- Does the filmmaker do a good job of communicating place? What are her challenges and how does she overcome them?
Digital Scavenger Hunt
Students will go on a “digital scavenger hunt” and find six images or video clips in Creative Commons that express the ideas communicated in their six “I Come from A Place” sentences.
I will demonstrate to the class how to import images into WeVideo and how to create voiceovers.
Students will bring the “finds” from their scavenger hunt into WeVideo and then make voiceovers with their external mics for their images using their six “I Come from a Place” sentences. Students will finish their projects at home and bring them in to show at the next class.
Video Sharing
Students will upload their videos to a video hosting service such as Vimeo or Youtube and we will discuss privacy settings on these platforms.
Rachel Walton
Olin Library
Rollins College
Rachel is the Digital Archivist at Rollins College. In that role, she works to acquire and preserve critical digital resources and historical artifacts. She also teaches information literacy and archival research classes to undergraduates. Rachel’s research interests include open access publishing, data management and visualization, and website usability.
Created in conjunction with Dr. Kristin Winet (Rollins College) Foodies in the Promised Land: Writing about Israeli Culture & Cuisine A 10 Day Field Study in Israel
Learning Outcomes
Written Communication
Students will practice their research and digital writing skills by investigating topics of interest, developing research questions, gathering notes and engaging in field work, and transforming their experiences into multimodal essays.
Metaliteracy
The four goals for metaliterate learners can be succinctly defined thusly:
(a) Evaluate traditional and online content critically; (b) Understand information ethics and what it means to be a creator and consumer of information in an online environment; (c) Share information in a conscientious and meaningful way and be aware of/open to other perspectives; (d) Demonstrate a connection between discrete research and writing practices, and personal or professional lifelong learning goals.
Course Goals
- Discover and appreciate the unique history and geography of Israeli cuisine
- Recognize the complexities involved in food research and writing
- Understand the stylistic techniques professional food writers use in their stories
- Develop skills in reporting, researching, and writing about food and food-related topics
- Use new digital technologies to create meaningful stories based on experiences
- Reflect and translate experiences for a public audience
Assignment/ Project
Guided food blog writing assignments aimed at improving student’s skills with rhetoric and writing as well as technology projects using digital media technologies like StoryMaps and WordPress will allow students to articulate the value of their travel experience upon arrival back home and explain its impact in their lives.
Pre-travel Research
- Meet with Rachel (your librarian) to select an aspect of Israeli food culture or foodways that interests you. Be prepared to research this chosen topic in depth.
- Using quality information resources online and from the Olin Library, write a brief (3-4 page single spaced) “white paper”/report informing your fellow travel writers about your chosen topic, so that they will be better prepared for their upcoming trip to Israel. Be sure to include proper MLA citations (with links) that show where you got your information in the form of a works cited list at the end of the paper.
- Meet with Dr. Winet to determine which day of the trip you will be serving as a field study expert on your chosen topic, to the benefit of your entire travel writer group. Be prepared to answer questions and even give demonstrations; we’re all relying on your expertise to help us learn about Israeli food!
On-site Travel Journal
During travel days, you will keep a written journal of foods you eat, impressions you have, thoughts and feelings you experience, and questions that come up. You will use this space to think about your final project, reflect on your eating, interviewing, and sightseeing experiences, and prepare for the next day’s events. Because travel writers take lots of notes, we expect you will write at least 750 words (3 pages) each day. Journals will be graded on quality of writing and depth of insight.
Personal StoryMap
-
- As you are taking on the role of a true “foodie” and professional travel writer during your time in Israel, you will keep an on-site travel journal (described above).
- You will also develop a collection of digital artifacts that serve to document and capture your many experiences across Israel, similar to a digital scrapbook. These can take the form of photos, recordings, video, GIFs, etc. Feel free to be creative (but remember, you’re a professional and these will be made available to the public!).
- After returning from your trip, take the time to interrogate how your digital artifacts and your travel journal notes align or diverge to form a larger story about your experiences in Israel. Look for themes, high points, low points, and other critical “takeaways” that could communicate the essence of your experiences.
- Using the StoryMap tool (Rachel will provide training and examples in advance of the project due date), meaningfully map your themes and “take-aways” by combining elements from your travel journal with select digital artifacts, and distribute them according to the geographic points you visited in Israel. Be sure to collage these pieces of your trip together in a way that tells your unique travel story.
- Be prepared to present your final “StoryMap” to the class and post the final product on the class blog alongside some commentary about your overall approach.
Blog Essay
-
- After returning from Israel, you will transform your research into a compelling feature-length digital essay incorporating text, image, video, and your StoryMap. This essay will be posted on our class website so that others can learn about your unique perspective on the topic you chose at the beginning of the field study.
- You will meet with Dr. Winet to discuss your project draft.
- At the end of our course, we will meet to present our final projects and debrief on what we learned about how to write “in the field.”
Participation
As professional food writers and guests of a foreign country, we expect that you will be present in mind and body each day of the field study. All students will sign a behavior contract at the beginning of the trip and be expected to maintain professionalism and collegiality throughout the entire experience.

Dr. Lori C. Walters Department of History University of Central Florida
Dr. Walters is a Research Associate with the Institute for Simulation and Training and the Department of History. Her research interest within the lab is Virtual Heritage – a multi-disciplinary approach to examining the past utilizing the latest digital technology to disseminate information. Shadows of Canaveral, a virtual return to the launch complexes that lined the shores of Cape Canaveral in the 1950s/1960s, began the Virtual Heritage effort.
Laser Scanning: Historic Structures, Sites & Artifacts Overview
A structure’s ‘life history’ encompasses its design, and its cultural significance to its surrounding community. Students will record a structure’s life history through the capture of digital data and then contextualize it through contemporaneous photographs, documents, and oral histories of individuals associated with an aspect of the building.
If a historic site or larger artifact (automobile, aircraft, or statue) is of interest, it can be substituted for a building.
This a semester long group project.
Objectives:
- The documentation of a structure using wide-ranging and encompassing methods to
preserve the history, culture and memories of the communities where the building resides.
- Students will learn how to operate a terrestrial laser scanner and register scan data.
- Students will incorporate oral history to contextualize an aspect of the structure.
- Students will present their research in a WordPress website.
Digital Tools:
- Terrestrial Laser Scanner – provided by course
- Digital Camera (smartphone or dedicated)
- Digital audio/video recorder (smartphone or dedicated)
- 64GB thumb drive – each student will need to provide their own
Software:
- Autodesk ReCap 360
- WordPress (free themes that groups can choose from)
Assignment Review:
Prior to the beginning of the semester, four structures will be selected that represent various architectural styles found in Central Florida. Owner consent will have been obtained prior to the semester. Students can select whichever building is of greatest interest to them.
Students will accompany the UCF ChronoPoints team (www.chronopoints.com) to their selected site to conduct a laser scan. In the event a student is unable to attend the scanning of their selected structure, they can attend the scanning of any building as the goal is to familiarize students with how to prepare a site, scanner/target placement and scanner operation. Scanner point cloud data gathered for their selected structure will be provided to the student.
A class period will provide an overview of how to register the point cloud data using Autodesk ReCap 360, which is provided to all UCF students free of charge. A class session will demonstrate how to register the scans. Data registration will be conducted outside class time.
Videos will be available for assistance.
While at the site during the laser scan and during secondary visits, students will conduct a photographic capture of the structure. This includes capturing the overall building and structural details. These images provide a secondary documentation of the structure as it exists at the time of laser scanning and details pertaining to original details. For example, each terrazzo floor has a distinct pattern.
This assignment strengthens traditional research skills. Students will locate historic photographs, blueprints, official documents, articles and ephemera. Every building has a story to tell, it could have been the cornerstone of a community for 50 years, designed by a noted architect, or simply where individuals lived or worked. However, in every instance, there is more to a building than brick and mortar and it is deeper than a simple timeline of events.
Oral history is a critical tool in preserving the recent past. Interviews of individuals associated with the structure will be captured. Depending on the age of the building, this could be the architect, structural engineer, member of the construction crew, someone who worked in the building or had some association with the structure. Collectively, the group will locate interviewees, develop potential questions and determine who will conduct each interview. The interviews will be transcribed and audio segments will be incorporated into the final project site.
Final Submission
The final product is a website that will tell the story of the group’s structure. Collectively, the students determine the site’s design and which specific items from those gathered that will be made available. The site will be developed in WordPress from free theme templates. While specific individual items are to be determined by the group, the following items are required to be available on their website:
- Images of the registered building – In gallery 1
- Selected Site photographs taken during scanning – In gallery 2
- Selected Historic Images – In gallery 3
- Digitized Blueprint if available
- Building Timeline
- Brief oral history clips
- History of Building – 2 pages
The following items must be submitted on thumb drive by each student:
- Raw scans (all students in the group will have the same raw scans)
- Registered scan of building (each student will register their selected building)
- All site photographs (taken by each student)
- All historic images gathered
- All blueprints if acquired
- The oral history conducted by the student – digital copy of actual interview and transcription.
- Each student will write a 2500 word paper addressing history of building
